vue的引出 页面更新 先来讲讲浏览器界面如何由服务器的数据局部 更新?
常见的有JSP、ASP、PHP。以JSP为例,后端向响应添加数据后通过EL表达式生成不同的 HTML文件,每次相当于刷新生成了新的界面,不属于局部更新。
DOM:文档对象模型(Document Object Model)是中立于平台和语言的接口,它允许程序和脚本动态地访问和更新文档的内容、结构和样式。
AJAX:异步的 JavaScript 和 XML(Asynchronous JavaScript and XML),是用来与服务器交换数据并更新部分网页的技术,避免了重新加载整个页面。
AJAX获取响应数据后可以通过由DOM来局部更新页面,显示接收到的数据。
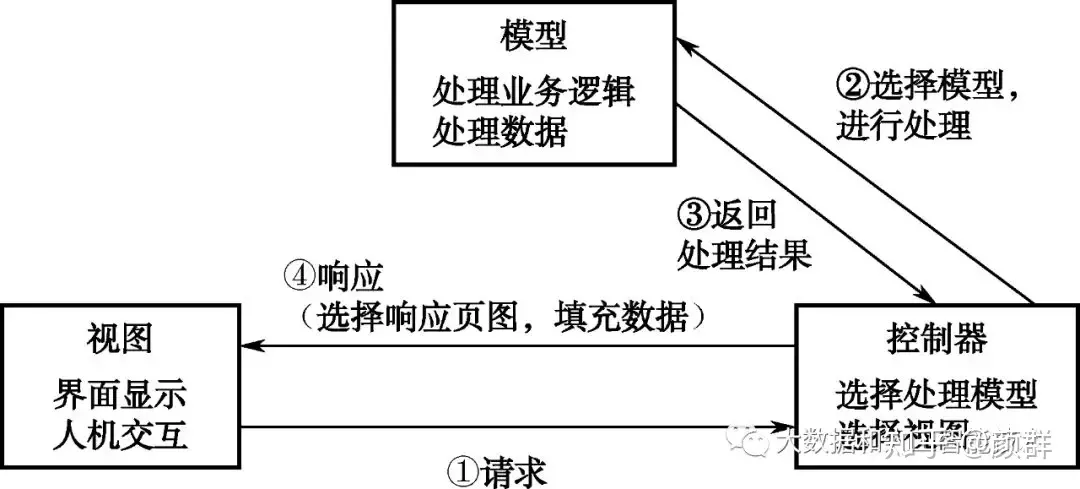
设计模式 再来说说web的设计模式
缺陷 :
1.controller连接view与model的职能过于繁重,二者之间代码耦合性太高。比如说依据模型操作接口的不同,视图可能需要多次调用才能获得足够的显示数据。对未变化数据的不必要的频繁访问,也将损害操作性能。
2.mvc模式如果只以jsp更新页面,每次数据更改都是对页面自身的转发,会导致页面的频繁刷新。
如果以ajax更新页面,大量的DOM操作使得开发复杂,且页面渲染性能降低,加载速度变慢,影响用户体验。
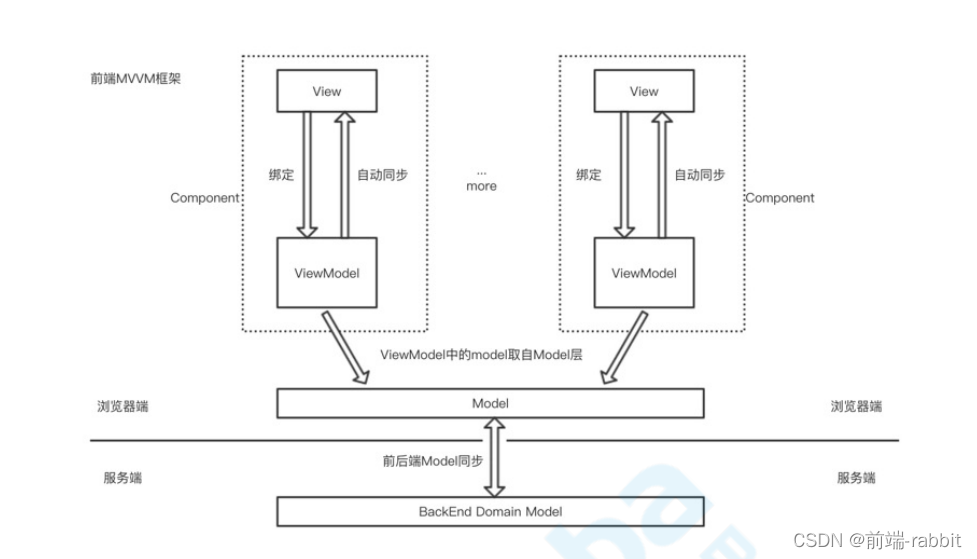
MVVM 模式
优势 :
1.ViewModel用框架实现后,开发者真正可以抛弃耦合View和Model 的代码(Controller部分),转而只专注模型与视图,View 和 Model 之间的同步工作完全是自动的,无需人为干涉。
2.自动更新DOM: 利用双向绑定 , 数据更新后视图自动更新 , 让开发者从繁琐的手动DOM中解放,并且像vue之类的mvvm框架使用虚拟dom的操作,大量减少了真实dom。
前端框架 1.jQuery
简化了DOM操作
2.Angular
将后端的MVC理念搬到了前端并增加了模块化开发的理念
3.React
提出”虚拟DOM”的操作,减少真实DOM
4.☆Vue
综合了Angular与React,一套构建用户界面的渐进式框架,只关注视图层, 采用自底向上增量开发的设计。
实现了MVVM模式,并且通过虚拟DOM减少了DOM使界面渲染性能降低,加载速度变慢,影响用户体验的问题。
2.vue基础语法 基本用法 {{表达式}}可以在组件中文本位置而非属性位置使用任意JavaScript 表达式
对组件的属性进行设置时可以使用v-bind:进行绑定,如 下所示,此时src会被替换为data中的imageSrc的值
vue3语法
1
2
3
4
5
6
7
8
9
10
11
12
13
14
<div id="app" class="demo"> <img v-bind:src="imageSrc"> </div> <script> const HelloVueApp = { data() { return { imageSrc: 'https://static.jyshare.com/images/code-icon-script.png' } } } Vue.createApp(HelloVueApp).mount('#app')//vue3 </script>
vue2语法
1
2
3
4
5
6
7
8
9
10
11
12
13
14
<div id="app" class="demo"> <img v-bind:src="imageSrc"> </div> <script src="https://cdn.jsdelivr.net/npm/vue@2"></script> <script> const HelloVueApp = new Vue({ el: '#app', data: { imageSrc: 'https://static.jyshare.com/images/code-icon-script.png' } }); </script>
v-bind:可以简写为:,所以<div :class="{'class1': use}">与上述代码效果是一样的
条件与循环 条件命令
1
2
3
4
5
6
7
8
9
10
11
12
13
14
15
16
17
18
19
20
21
22
23
24
25
<div id="app"> <div v-if="type === 'A'"> A </div> <div v-else-if="type === 'B'"> B </div> <div v-else-if="type === 'C'"> C </div> <div v-else> Not A/B/C </div> </div> <script> const app = { data() { return { type: "C" } } } Vue.createApp(app).mount('#app') </script>
循环命令也可以对对象操作
1
2
3
4
5
6
7
8
9
10
11
12
13
14
15
16
17
18
19
20
21
22
23
<div id="app"> <ul> <li v-for="(value, key, index) in object"> {{ index }}. {{ key }} : {{ value }} </li> </ul> </div> <script> const app = { data() { return { object: { name: '菜鸟教程', url: 'http://www.runoob.com', slogan: '学的不仅是技术,更是梦想!' } } } } Vue.createApp(app).mount('#app') </script>
监听器属性 v-model用于对input,checkbox,radio等能输入值改变的属性进行双向绑定,输入的值与vm中的data能相互同步
.lazy
转变为在 change 事件中同步输入框的值与数据
.number
自动将用户的输入值转为 Number 类型(如果原值的转换结果为 NaN 则返回原值)
.trim
自动过滤用户输入的首尾空格,可以添加 trim 修饰符到 v-model 上过滤输入:
监听器watch可以监听某一data的属性的变化并调用函数
1
2
3
4
5
6
7
8
9
10
11
12
13
14
15
16
17
18
19
20
21
22
23
24
25
26
27
28
29
30
31
32
33
34
35
36
<div id = "app"> 千米 : <input type = "text" v-model = "kilometers" @focus="currentlyActiveField = 'kilometers'"> 米 : <input type = "text" v-model = "meters" @focus="currentlyActiveField = 'meters'"> </div> <p id="info"></p> <script> const app = { data() { return { kilometers : 0, meters:0 } }, watch : { kilometers:function(newValue, oldValue) { // 判断是否是当前输入框 if (this.currentlyActiveField === 'kilometers') { this.kilometers = newValue; this.meters = newValue * 1000 } }, meters : function (newValue, oldValue) { // 判断是否是当前输入框 if (this.currentlyActiveField === 'meters') { this.kilometers = newValue/ 1000; this.meters = newValue; } } } } vm = Vue.createApp(app).mount('#app') vm.$watch('kilometers', function (newValue, oldValue) { // 这个回调将在 vm.kilometers 改变后调用 document.getElementById ("info").innerHTML = "修改前值为: " + oldValue + ",修改后值为: " + newValue; }) </script>
事件处理属性 事件处理使用v-on:,可以用@简写
可以直接绑定到一个方法,也可以用内联 JavaScript 语句:
1
2
3
4
5
6
7
8
9
10
11
12
13
14
15
16
17
18
19
20
21
22
23
24
<div id="app"> <button @click="say('hi',$event)">Say hi</button> </div> <script> const app = { data() { }, methods: { say(message,event) { alert(message) // `methods` 内部的 `this` 指向当前活动实例 alert('Hello ' + this.name + '!') // `event` 是原生 DOM event if (event) { alert(event.target.tagName) } } } } Vue.createApp(app).mount('#app') </script>
事件修饰符
.stop - 阻止冒泡.prevent - 阻止默认事件.capture - 阻止捕获.self - 只监听触发该元素的事件.once - 只触发一次.left - 左键事件.right - 右键事件.middle - 中间滚轮事件
按键修饰符
.enter.tab.delete (捕获 “删除” 和 “退格” 键).esc.space.up.down.left.right.ctrl.alt.shift.meta
3.vue自定义 自定义组件 首先需要知道const app = Vue.createApp()的结果是最大的父组件,以下都用app作为根组件来记录
示例代码(以全局组件为例)
1
2
3
4
5
6
7
8
9
10
11
12
13
14
15
16
17
18
19
20
21
22
23
24
25
26
27
28
29
30
31
32
33
34
35
36
37
38
39
40
41
42
43
44
45
46
47
48
49
50
51
52
53
54
55
56
57
<!DOCTYPE html> <html lang="en"> <head> <meta charset="UTF-8"> <meta name="viewport" content="width=device-width, initial-scale=1.0"> <title>Vue 3 with Component Example</title> <!-- 引入Vue.js 3 --> <script src="https://unpkg.com/vue@next"></script> </head> <body> <div id="app"> <!-- 使用自定义组件 --> <custom-greeting :message="greeting" @change-message="changeGreeting"></custom-greeting> </div> <script> // 定义一个自定义组件 const CustomGreeting = { props: ['message'],//可被{{message}}读取 template: ` <div> <h1>{{ message }}</h1> <button @click="changeMessage">Change Message</button> </div> `, methods: { changeMessage() { this.$emit('change-message', 'New Message from Child'); } } }; // 创建一个Vue实例 const app = Vue.createApp({ data() { return { greeting: 'Hello, Vue 3 with Components!' }; }, methods: { changeGreeting(newMessage) { this.greeting = newMessage; } } }); // 注册自定义组件 app.component('custom-greeting', CustomGreeting); // 将Vue实例挂载到HTML中的元素 app.mount('#app'); </script> </body> </html>
注册组件(全局组件)
1 app.component('custom-greeting', CustomGreeting);
使用组件
1 <custom-greeting :message="greeting" @change-message="changeGreeting"></custom-greeting>
注册组件(局部组件)
1
2
3
4
5
6
7
const app = Vue .createApp ({ components : { '组件名' :组件对象 'component-a' : ComponentA , 'component-b' : ComponentB } })
子组件格式
props: [‘a’,’b’],设置组件应该传入的属性
template,设置组件的原生组件构成
method。设置组件应该含有的方法
子组件自定义事件
当你在子组件中使用 this.$emit 时,它允许子组件触发一个自定义事件,通知父组件或其他监听这个事件的地方发生了某些事情:
this.$emit('自定义事件名称', '传递的数据');
假设子组件child发生alpha事件时父组件调用函数
子组件中要有this.$emit('alpha', '传递的数据');
父组件可以如此使用子组件<child :a="a属性值" :b="b属性值" @alpha="父组件要调用的函数">
父组件调用的函数的第一个参数便是子组件传递的数据
Prop验证
1
2
3
4
5
6
7
8
9
10
11
12
13
14
15
16
17
18
19
20
21
22
23
24
25
26
27
28
29
30
31
32
33
34
35
<script> app.component('my-component', { props: { // 基础的类型检查 (`null` 和 `undefined` 会通过任何类型验证) propA: Number, // 多个可能的类型 propB: [String, Number], // 必填的字符串 propC: { type: String, required: true }, // 带有默认值的数字 propD: { type: Number, default: 100 }, // 带有默认值的对象 propE: { type: Object, // 对象或数组默认值必须从一个工厂函数获取 default: function () { return { message: 'hello' } } }, // 自定义验证函数 propF: { validator: function (value) { // 这个值必须匹配下列字符串中的一个 return ['success', 'warning', 'danger'].indexOf(value) !== -1 } } } }) </script>
插槽slot
ChildComponent.vue
1
2
3
4
5
6
7
8
9
10
11
12
13
14
15
<template> <div class="child-component"> <h2>Child Component</h2> <!-- 插槽定义 --> <slot></slot> </div> </template> <style scoped> .child-component { border: 1px solid #ddd; padding: 10px; margin: 10px; } </style>
ParentComponent.vue
1
2
3
4
5
6
7
8
9
10
11
12
13
14
15
16
17
18
19
20
21
22
23
24
25
<template> <div> <h1>Parent Component</h1> <!-- 使用子组件,并在插槽中插入内容 --> <ChildComponent> <p>This content will go into the slot of the ChildComponent.</p> <button @click="buttonClick">Click me</button> </ChildComponent> </div> </template> <script> import ChildComponent from './ChildComponent.vue'; export default { components: { ChildComponent, }, methods: { buttonClick() { alert('Button clicked!'); }, }, }; </script>
图中<p> 元素和 <button> 元素被插入到了 ChildComponent 的插槽中
自定义指令 全局指令注册
1 2 3 4 5 6 7 app.directive ('focus' , { mounted (el ) { el.focus () } })
局部指令注册
1
2
3
4
5
6
7
8
9
10
11
12
13
14
const app = { data ( return { } }, directives : { focus : { mounted (el ) { el.focus () } } } }
指令使用
钩子函数
created : 在绑定元素的属性或事件监听器被应用之前调用。beforeMount : 指令第一次绑定到元素并且在挂载父组件之前调用。。mounted : 在绑定元素的父组件被挂载后调用。。beforeUpdate: 在更新包含组件的 VNode 之前调用。。updated: 在包含组件的 VNode 及其子组件的 VNode 更新后调用。beforeUnmount: 当指令与在绑定元素父组件卸载之前时,只调用一次。unmounted: 当指令与元素解除绑定且父组件已卸载时,只调用一次。
钩子函数的参数
el :指令绑定到的元素。这可用于直接操作 DOM。
binding :是一个对象,包含以下属性:
instance:使用指令的组件实例。value:传递给指令的值。例如,在 v-my-directive="1 + 1" 中,该值为 2。oldValue:先前的值,仅在 beforeUpdate 和 updated 中可用。值是否已更改都可用。arg:参数传递给指令 (如果有)。例如在 v-my-directive:foo 中,arg 为 "foo"。modifiers:包含修饰符 (如果有) 的对象。例如在 v-my-directive.foo.bar 中,修饰符对象为 {foo: true,bar: true}。dir:一个对象,在注册指令时作为参数传递。例如,在以下指令中:
vnode :作为 el 参数收到的真实 DOM 元素的蓝图。
prevNode :上一个虚拟节点,仅在 beforeUpdate 和 updated 钩子中可用。
单文件组件 Vue 的单文件组件 (即 ***.vue** 文件,英文 Single-File Component,简称 SFC) 是一种特殊的文件格式,使我们能够将一个 Vue 组件的模板、逻辑与样式封装在单个文件中。
在 Vue3 中,你可以使用 .vue 文件来创建单文件组件(Single File Components, SFCs),这个文件包含了组件的模板、JavaScript 代码以及 CSS 样式。
注意: 在单文件组件中,虽然只有script 部分显式地导出了(export default)组件的配置信息(name….)并用于在别处创建组件,template 与style 并没有被导出,但是但是它仍然是该组件的一部分,由 Vue 的构建工具(vue-cli,webpack)进行处理。当你在其他地方导入该组件时,整个组件(包括模板、脚本、样式等部分)会被一同导入和使用。
示例:
App.vue文件代码:
1
2
3
4
5
<template> <div> <hello-runoob></hello-runoob> </div> </template>
HelloRunoob.vue 文件代码:
1
2
3
4
5
6
7
8
9
10
11
12
13
14
15
16
17
18
19
<template> <div> <h1>{{ message }}</h1> </div> </template> <script> export default { data() { return { message: 'Hello, Runoob!' } } } </script> <style> h1 { color: red; } </style>
main.js文件代码:
1
2
3
4
5
6
7
8
import { createApp } from 'vue' import App from './App.vue' import HelloRunoob from './components/HelloRunoob.vue' const app = createApp (App )app.component ('hello-runoob' , HelloRunoob ) app.mount ('#app' )


